Summer sun and fun has had me thinking about simpler times when we used to blow bubbles, play with jacks, run outside all Summer and watch a pinwheel spin! So when I was asked to decorate tables for a Sunny Summer BBQ I knew exactly what I wanted to create! PINWHEELS! Just wait till you see what fun I had with them!
It all started with this fabric. I was given a pink and orange floral and striped plate and built on my Summer theme from there. In the end everyone was amazed how perfect the fabric matched the plates. Like it was meant to be.
To make a paper pinwheel you take a square of paper {any size will do as long as it's square}. I went with paper colors that coordinated with the fabric. I took two 8 1/2 x 11 inch sheets of colored paper {corresponding colors because you will see part of each side in the finished pinwheel} and stack them on top of each other. Then just fold them {together} in half on a diagonal.
Then fold it in half diagonally again.
Open up {leaving the two papers on top of each other} and cut on the four diagonal fold lines. Stop about 1/4 inch from the center so it will stay attached.
Then pull one side {do the same side on each one} of each of the four triangles towards the center and hot glue in place.
Once all four corners are brought in and glued, staple the center to make sure it will hold tight.
I decided to do two different colorways since I was using them as table centerpieces and wanted one pinwheel on each side of the stick so it would look great all the way around the table.
Next I found some large buttons to attach to the pinwheel centers to finish them off. The large round circles are also found on the daisy fabric and ties things together even more.
Attaching the buttons with hot glue didn't hold them securely so I took orange embroidery floss and stitched them down, and then glued one pinwheel of each color to the pinwheel sticks. {2 pinwheels for each stick}
Now for the pinwheel sticks! {My favorite part too!} The easiest way to color the sticks was to wrap them with fabric! I cut one inch strips of my napkin fabric and used it. I put dots of hot glue at the beginning and end of each stick and about every inch or so as I wrapped the fabric.
You must know that I was so excited about these darling sticks that I made them first, put them in a tiny crystal vase and stared at them all day as I made the pinwheels and napkins! I'm in love!
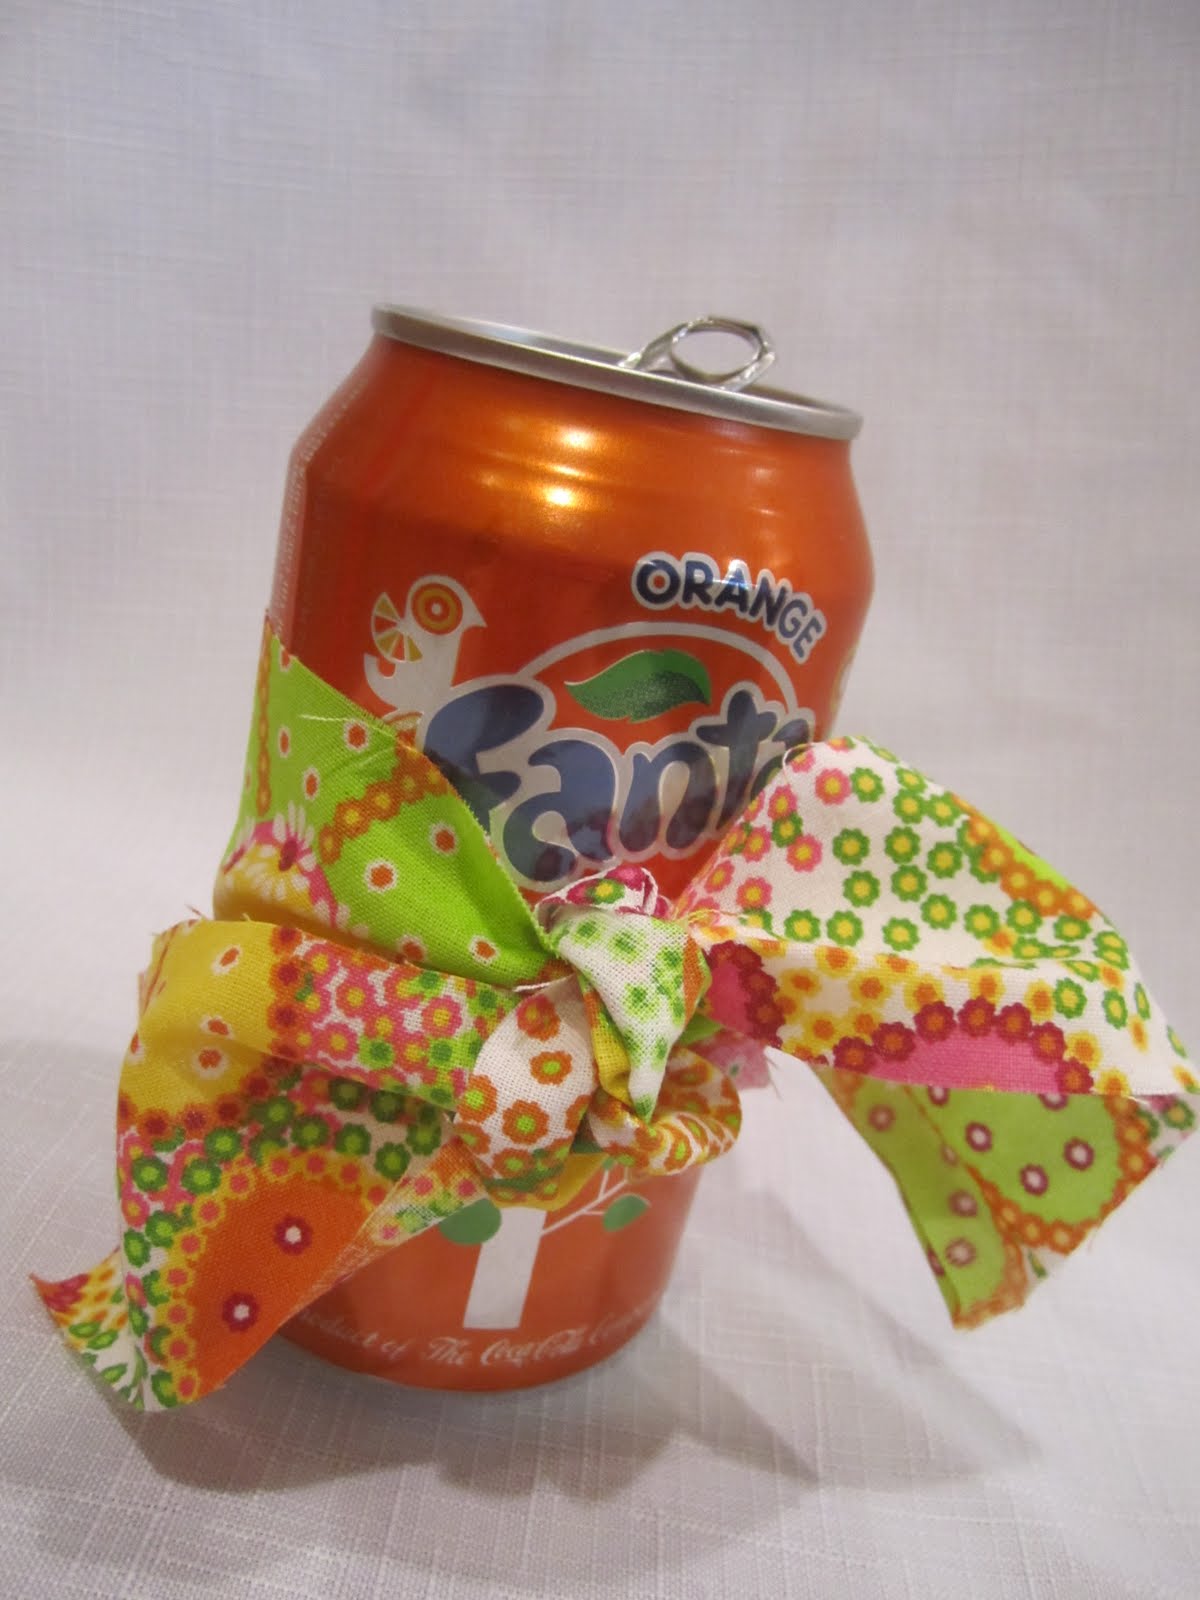
So I had a million different ideas spinning around on what to place the pinwheels in for these centerpieces, and each one of them would have been fabulous! Then inspiration hit once again when I turned around in the store and saw these Fanta Orange Soda cans {and on sale for $1 a six pack}! What says Summer BBQ more than Fizzy Orange Fanta? Already colored orange and with an opening just large enough for a pinwheel on a stick! I did dump out the soda, clean cans, and then filled them with glass pebbles for weight.
Once I hot glued each of the two different colored pinwheels to the stick, I realized how you could see the colors on the pinwheels behind coming through. I like how the colors mixed well together.
So ten cans, ten fabric wrapped sticks, ten stitched fabric napkins, and 20 bright and buttoned paper pinwheels later... my centerpieces were ready for the party!
Sitting on top of the bright and cheery fabric napkins {that I made} these pinwheels couldn't look any cuter, don't you think? Perfect for a Sunny Summer Day!
I've linked this project up to
WhipperBerry's Friday Flair
Faith, Trust, & a Little Pixie Dust


These are darling! I love the colors.
ReplyDeleteFantastic! Your pinwheels will put a smile on any party-goers face! I just love how cheerful and bright the colors are, and the sticks just complete the look with the "pop" that it needed! Thanks for stopping by my blog and leaving the sweet comment, I'll be your newest follower, and I'd love it if you came by and followed me back.
ReplyDeleteWonderful! My kids would love these and the colors you chose are just so cheerful!!
ReplyDeleteoooh, I love pinwheels! Those are darling!
ReplyDeleteOh my goodness, what an adorable project. I would love for my readers to see it! Please do come over & join my Fab Friday linky party!
ReplyDeleteWarmly, Michelle
Wonderful colors, They look great.
ReplyDeleteThose are super cute! Love the colors! Thanks for the blog visit & comment luv :)
ReplyDeletelove the bright colors. your pinwheels are super cute!
ReplyDeleteDARLING! That fabric is just gorgeous and the pinwheels are too! Great job! jules
ReplyDeleteLOve them! I wish I needed a summer centerpiece. Good to know I can find directions again in your blog.
ReplyDeleteThanks for sharing this at my linky party! I'm featuring it in my "Fab Friday Favorites" tomorrow evening. Please feel free to grab an "I Was Featured" button.
ReplyDeleteWarmly, Michelle
Thanks everyone for all of the Pinwheel LOVE! They were a lot of fun!
ReplyDeleteSorry I came late to the party Wendy! Oh my gosh... your pinwheels are ADORABLE!!! Thank you for the tutorial - how FUN! And that fabric is just too groovy and summery - LOVE IT! You did a fantastic job (or should I say FANTA-tastic job, hehehe) with all your decorations and creativity! :D
ReplyDeleteThese are great! I followed your instructions and they saved me for one of my last minute projects. Thanks so much!!
ReplyDeletehello !
ReplyDeleteI love your colourful windmill and I tried making them myself.but my windmill couldn't work properly :(( do u know why it doesn't work properly?and suggest how i should make the windmill?
thank you v much :)
Glad they helped you Celia. Anonymous I made these for decoration and if you want them to spin you would need to attach a metal brad instead of sewing a button on.
ReplyDeletethese are wonderful, your instructions are so clear and I love how you covered the sticks with fabric. Glad I found your page! :)
ReplyDeleteThank you so much for your kind words and feedback!
DeleteThese are ADORABLE!!!!!!! Thanks for sharing!
ReplyDeleteThanks!
DeleteFABULOUS tutorial!!! Pinned! :)
ReplyDeleteI'm happy that you liked it! Love pinterest too! Thanks!
DeleteGreat Idea! I'm putting these on a string with straws for spacing to use as a garland for a birthday party!
ReplyDeleteWhat a darling idea!
DeleteI love your pinwheel, gonna make one as a gift for the students and for the english course promotional gift :P . Superb!! Thank you so much Wendy
ReplyDeleteRegards from Indonesia